

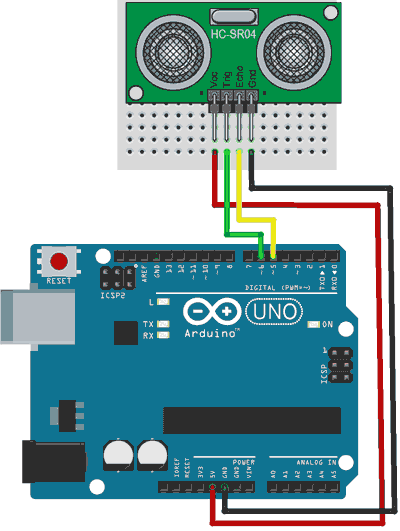
MEDIR DISTANCIAS POR ULTRASONIDOS MEDIANTE EL SENSOR HC-SR04
El código referente a la medida de distancias con ultrasonidos es original de Luis Llamas (lo he modificado para que envíe los datos vía Bluetooth), y lo podéis encontrar aquí.
El sensor de ultrasonidos se conecta así:
El código para medir y enviar distancias al smartphone es éste:
[code][/code]
[code]
//CÓDIGO ARDUINO PARA MEDIR DISTANCIAS CON HC-SR04
const int EchoPin = 9;
const int TriggerPin = 8;
const int LedPin = 13;

void setup() {
   Serial.begin(19200);
   pinMode(LedPin, OUTPUT);
   pinMode(TriggerPin, OUTPUT);
   pinMode(EchoPin, INPUT);
}

void loop() {
   int cm = ping(TriggerPin, EchoPin);
   Serial.print(cm);
   Serial.println();
   delay(100);
}

int ping(int TriggerPin, int EchoPin) {
   long duration, distanceCm;

   digitalWrite(TriggerPin, LOW);  //para generar un pulso limpio ponemos a LOW 4us
   delayMicroseconds(4);
   digitalWrite(TriggerPin, HIGH);  //generamos Trigger (disparo) de 10us
   delayMicroseconds(10);
   digitalWrite(TriggerPin, LOW);

   duration = pulseIn(EchoPin, HIGH);  //medimos el tiempo entre pulsos, en microsegundos

   distanceCm = duration * 10 / 292/ 2;   //convertimos a distancia, en cm
   return distanceCm;
}
//HASTA AQUÍ EL CÓDIGO
[/code]
SENSOR DE TEMPERATURA Y HUMEDAD DHT11
A continuación, para usar el detector de Temperatura y Humedad (hay que instalar una librería, y quizás no seamos capaces; dejaremos esta parte de la práctica para el final), necesitaremos una resistencia de 10 kΩ para conectarlo:

Y el código:
//CÓDIGO PARA USAR SENSOR DE TEMPERATURA Y HUMEDAD DHT11
// Example testing sketch for various DHT humidity/temperature sensors
// Written by ladyada, public domain
#include "DHT.h"
#define DHTPIN 2 // what digital pin we're connected to
// Uncomment whatever type you're using!
#define DHTTYPE DHT11 // DHT 11
//#define DHTTYPE DHT22 // DHT 22 (AM2302), AM2321
//#define DHTTYPE DHT21 // DHT 21 (AM2301)
// Connect pin 1 (on the left) of the sensor to +5V
// NOTE: If using a board with 3.3V logic like an Arduino Due connect pin 1
// to 3.3V instead of 5V!
// Connect pin 2 of the sensor to whatever your DHTPIN is
// Connect pin 4 (on the right) of the sensor to GROUND
// Connect a 10K resistor from pin 2 (data) to pin 1 (power) of the sensor
// Initialize DHT sensor.
// Note that older versions of this library took an optional third parameter to
// tweak the timings for faster processors. This parameter is no longer needed
// as the current DHT reading algorithm adjusts itself to work on faster procs.
DHT dht(DHTPIN, DHTTYPE);
void setup() {
Serial.begin(9600);
Serial.println("DHTxx test!");
dht.begin();
}
void loop() {
// Wait a few seconds between measurements.
delay(2000);
// Reading temperature or humidity takes about 250 milliseconds!
// Sensor readings may also be up to 2 seconds 'old' (its a very slow sensor)
float h = dht.readHumidity();
// Read temperature as Celsius (the default)
float t = dht.readTemperature();
// Read temperature as Fahrenheit (isFahrenheit = true)
float f = dht.readTemperature(true);
// Check if any reads failed and exit early (to try again).
if (isnan(h) || isnan(t) || isnan(f)) {
Serial.println("Failed to read from DHT sensor!");
return;
}
// Compute heat index in Fahrenheit (the default)
float hif = dht.computeHeatIndex(f, h);
// Compute heat index in Celsius (isFahreheit = false)
float hic = dht.computeHeatIndex(t, h, false);
Serial.print("Humidity: ");
Serial.print(h);
Serial.print(" %\t");
Serial.print("Temperature: ");
Serial.print(t);
Serial.print(" *C ");
Serial.print(f);
Serial.print(" *F\t");
Serial.print("Heat index: ");
Serial.print(hic);
Serial.print(" *C ");
Serial.print(hif);
Serial.println(" *F");
}
//HASTA AQUÍ EL CÓDIGO
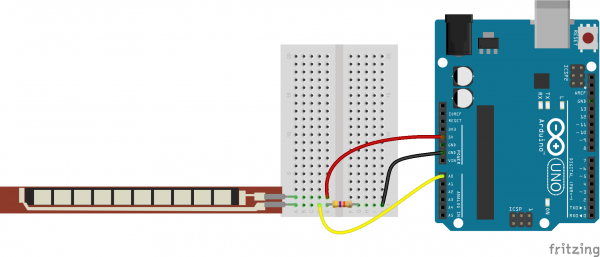
USO DE SENSORES DE DOBLADO (FLEX SENSORS):
Son resistencias que varían su valor CUANDO SE DOBLAN. Así las cosas, necesitaremos conectarlas en divisor de tensión (al modo en que lo hacemos con las LDR a una de las entradas analógicas de nuestra Arduino, por ejemplo, con una resistencia de 10 kΩ:
Y utilizar un código para leer el valor. El más sencillo sería éste:
void setup() {
  // put your setup code here, to run once:
Serial.begin(19200);
}
void loop() {
// put your main code here, to run repeatedly:
int valor=analogRead(A1);
Serial.println(valor);
delay(100);
}
//HASTA AQUÍ EL CÓDIGO
¡Y ya está!. ¡Eso sería todo por hoy!. ¿Qué os ha parecido?. ¡El próximo día, más y mejor!.